

You must be loving the idea of making your kitchen ventilated and bright with sunlight. Your kitchen needs to have proper exhaustion and ventilation system, as you spend most of the day in your kitchen.
Do you like to have a window above your sink?
Do you love fresh, natural air coming into your kitchen?
Do you want to enjoy the natural sceneries while washing dishes?
Do you love the feeling of daylight entering in your kitchen?
If Yes! Then this article is definitely for you guys. In this article, we will guide you about all the important tips to remember while venting a kitchen sink under the window. You don’t need a plumber after that, and you can do this task by yourself. This will make you get the best budget kitchen sink within little effort.

The step by step process
Here are a few important steps that you can follow and fix your vent pipe
1. Link the Sink with Drain Pipe and choose the layout of the pipe
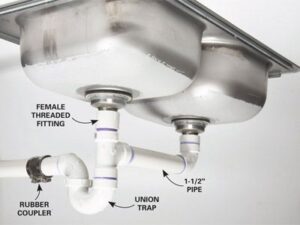 The first step which you have to do is connect the Drain Pipe to the Sink. After taking the measurements, get the Vent Pipe’s specific size and attach it to the sink. Next, you have to measure your layout of Vent Pipe and select your Vent Pipe direction. The Pipe must be in an upward direction, short from the distance to the top of the sanitary fitting.
2. Connect the Vent pipe with the opening and mark points
 The next step is to take the PVC pipe and cut 1 1/2 inch and attach it to the opening of the top of the sanitary fitting. Mark the Chalk Line while attaching.
3. Drill opening and add 2nd Elbow Fitting
 No, you have to drill a hole of 1 1/3-inch. After drilling, connect the Vent Pipe in the hole, then add a second Elbow fitting, at the end of the Vent Pipe, by leaving a gap between both fittings.
4. Add the PVC Pipe in Straight-up direction and vertically
 The next step is the installment of PVC Vent Pipe in a straight-up vertical direction. So, all you have to do is to place the windpipe in a perfect direction. So, it may be stable and strong.
5. Connect another PVC Elbow and finally attach Vent Pipe
 After all the processes, now this is the time of the final process. In this process, you have to attach the pipe to the Stack. You can do this by using a PVC-fitting, to carry out the exact measurements of Stack’s diameter and 1 1/2 sink Vent Pipe calculations.
Final words
By following these simple processes, you can vent your kitchen sink, without hiring a plumber. Be independent, and make your kitchen look lovely. You can have the best budget and less charging kitchen sink by doing the task yourself.