
It’s difficult to bore a hole in stainless steel objects like a sink but obviously not difficult when you have instruments available with you.
These days’ stainless steel sinks are famous and used everywhere as they have many popular features like anti-corrosion, easy handling, easy to use, easily cleanable and superior then marble or stone sinks.
For example, if we want to install a tap or soap machine into the sink, we must bore or puncture into stainless steel sink by drilling it, and it would be easy if you know the right process and have the necessary tools available.

Process of making holes in stainless steel sinks
Without using tools you cannot bore, so the following tools are required
- Drill
- Lubricant-Some 3 in 1 oil or similar
- Hammer
- A “brand new standard size 3/8” Bi-metal hole cutter (some Faucets/Vales require a 1½ hole)
- A small wooden block may be required sometime
- Centre punch or Nail
- A Marker (sharpie or similar)
- An Old Rag
- Safety Glasses
- Measuring Tape
- A small file o emery cloth
You might need to drill holes for faucets or for mounting undermount sinks. Try to stay away from this hassle. The best thing would be to get the best undermount kitchen sink. These will be much easier to install.
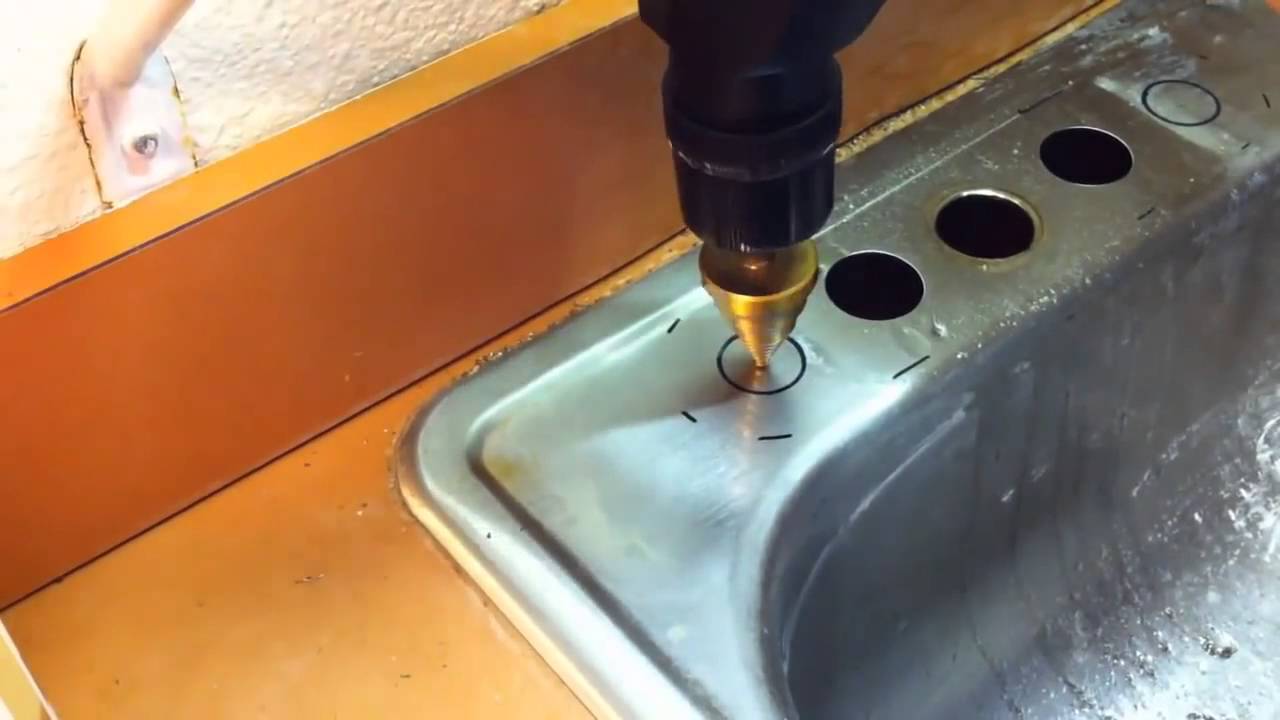
Step 1: Mark the area for drilling
Firstly, find out the spot for drilling and confirm it because after drilling not possible to close that hole. Make sure two things potential damages under the sink and distance from pipes as it is highly required to complete it perfectly.
In a different way, you can use a measuring tape to measure the distance from the sink to that particular place and do marking and then do hole.
Step 2: Indentation
The second important step is Indentation in which you can mark the area using a small nail on the sink. It is done to stop the spinning of the drill when it drills on the sink surface.
Step 3- Lubrication of Drill bit
Lubrication is required for better life of drill bit, to improve performance, and to stop vibrations.
Step 4- Protect your eyes with Protective Eyewear
Always wear protective equipment like safety goggles while drilling. A spinning bit during drilling work can go into your eyes and damages your eye.
Step 5- Start Drill
Now select the drill bit by doing measurement and assure yourself that drilling is at a particular point only. Now, hold the drill bit in a vertical position and start at low speed. When you find out it puncture the sink surface, then stop drilling and change bit of ¼ inch with ½ inch and continue drilling sink surface. By doing this, drilling is complete.
Step 6- Remove Sharp Edges
Here, your drilling work is not complete actually, as the surface is still not smooth. Now take emery cloth to smooth the rough surfaces or edges. Be careful while doing all this work as this can damage your hand also so try to use puncture or cut-resistant hand gloves to save your hands.
Final Step
In this way, your drilling is complete in a stainless steel sink. For more holes, follow the same process.